


Keystone mini/caps
Introduction and Products of Keystone Universal & Mini cap Products
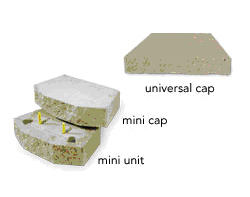
The keystone Mini Unit is a boon for smaller, non-critical solutions. It is very easy to handle and install. The4’’ Mini unit is used to make some attractive walls. It can be also integrated with 8’’ to make high standard or Compac Units. The proportion and scale of Mini Unit blends well with brick and ledge stone are found in residential areas. The unit is also used as 4’’ high cap unit to finish wall installations and it also provides smooth top surface.
Universal & Mini Cap Units Specifications
| mini/caps units | universal cap | |
| height | 4" | 4" |
| width | 18" | 18/14" |
| depth | 10-1/2" | 10-1/2" |
| weight | 45lbs | 48lbs |
The specifications of the units can vary according to the location and size of the wall. These specifications are for the maximum wall height of 24’’.
Estimation of Universal & Mini cap Products
| WALL HEIGHT | WALL LENGTH (measured at wall face including curves) | |||||
| 5' | 10' | 15' | 20' | 25' | 30' | |
| 4"(1 course) | 3 | 7 | 10 | 13 | 17 | 20 |
| 8" (2 courses) | 6 | 14 | 20 | 26 | 34 | 40 |
| 12" (3 courses) | 9 | 21 | 30 | 39 | 51 | 60 |
| 16" (4 courses) | 12 | 28 | 40 | 52 | 68 | 80 |
| 20" (5 courses) | 15 | 35 | 50 | 65 | 85 | 100 |
| 24" (6 courses) | 18 | 42 | 60 | 78 | 102 | 120 |
This estimation is based on the maximum wall height of 24’’. Change in color on chart denotes maximum wall height for vertical and setback positions. The maximum height is based on a level grade, total granular soil, wall built in setback position, and no surcharge.
Universal & Mini Cap Units Installation
Installation is done in five steps which are as follows:
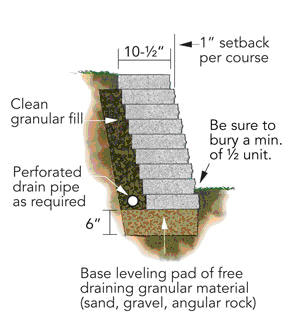
- Prepare Base Leveling Pad: Once the length and location of wall is fixed the base trench is evacuated and the minimum width and depth of 20’’W×12’’D. The leveling of pad should start from the lowest elevation. Step up in 4” increments with the base as required at elevation changes in the foundation. Level the prepared base with 6" of well-compacted granular fill.
- Installing the Base Course: In this first layer is installed by laying the mini units side by side over the prepared footing. The placement of units should be such that they make a kidney shaped void.
- Installing the Pins: Place the high-strength fiberglass pins into the paired holes in each unit. Once in place, the pins will automatically position the next course.
- Installing the Backfill: In this step backfill is filled behind each layer of mini units.
- Installing Additional Courses: In this additional layers of Mini Joints are positioned in the fiberglass pins of the layer below. Installation of additional in the layer is done in a way in which it bridges the two units beneath it. The final step to interlock the upper layer is to pull the upper unit towards the face of the wall until it makes full contact with both pins.
Hire a Mini/Caps Retaining Wall Contractor Now
Normally in small construction the role of contractor may not be important but when it comes to projects which involve bulky structures the role of contractor is the deciding factor for providing the strength and stability to the project. Our company has got specialized contractors for wall retention at a very affordable price. Contact us and find out more.
Gallery of Retaining Walls in
Recent Blog Posts
Features of a VPN Application
A vpn application enables users to send and acquire data throughout a network, extending their very own private network across open public networks. It provides privacy just for users affordable , you can that just authorized people have acc... read more


