


Keystone Standard Units
Keystone Standard Units Information
An American original, the keystone standard unit is the opener of this industry and is also the leader of the industry for tall walls and critical structures even now. The keystone standard unit’s mechanical structure with its good height-to-depth ratio provides both well structured and engineered wall system. In addition to this it also provides superior construction stability, durability and strength to the wall systems. The properties of keystone standard unit make it the favorite of architects and engineers whenever safety and security of wall designs is of main concern.
Specifications of Keystone Standard Units
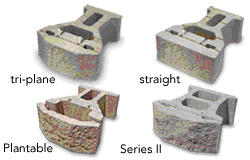
These are of four types:
- tri plane
- straight
- plantable
- series II
The product size, weight, color and product availability varies by location. With respect to height width depth weight and pins keystone standard units can be classified as follows:
| 3-plane | straight | series II | plantable | |
| height | 8" | 8" | 8" | 8" |
| width | 18" | 18" | 18" | 18" |
| depth | 21-1/2" | 21-1/2" | 18" | 21-1/2" |
| weight | 105lbs | 105lbs | 105lbs | 95lbs |
| pins | yes | yes | yes | yes |
Product size, weight, color and product availability varies by location.
Installation of Keystone Standard Units
The installation procedure consists of following six steps:
- Prepare the base leveling pad: Start the leveling pad at the lowest elevation of the wall. All the debris and surface vegetation should be removed and must not be used as backfill. The leveling pad should be prepared with six inches (150mm) of well compacted granular filling (class II road base or 3/4" [20 mm] crushed stone) of pad base. A step up of 8 inches (200mm) should be taken for changes in elevation. Pea gravel should not be used for leveling of the pad.
- Install the base course: End to end placement of first course of keystone century units should be done .The receiving pin hole or kidneys on the unit should be placed downward and the pin holes should face upward .The first course leveling is critical for accurate and acceptable results. Each unit should be level side to side and also front to back. Embedment of base course should not be less than 1" for every course. Minimum radius for convex and concave curves is 3'-6" (1 m). Curved walls can be constructed by the use of front pin position.
- Insert the fiberglass pins: The reinforced fiberglass pins are placed into the paired holes of keystone units where the pins of adjoining units should be 12”(305mm) on center. Place pins in the front holes for near vertical (1/8" or [3 mm]) setback and the rear holes for 11/4" (32 mm) setback per course, as per the wall requirements and design considerations.
- Install core & fill compaction: After the installation of the pins, 3/4-inch (20mm) crushed stone drainage fill should be provided behind the units to a minimum distance of 2 foot (0.6m) behind the tail. Fill all open spaces between units and open cavities/cores with the same drainage material.
- Backfill soil should be placed in maximum eight inch (200mm) layers and Compact soils to a minimum of 95% Standard Proctor compaction, placing fill in 8" (200 mm) lifts on a course-by-course basis. Sweep off any pebbles or debris so the next Keystone units rest evenly upon the layer below. Pea gravel should not be used. Only walk-behind mechanical compaction equipment within 3' [1 m] behind the units should be used to avoid overstress at certain places.
- Install additional courses: The next course of keystone century wall units should be placed over the fiberglass pins which fit to the long receiving channel recess in the other units above to it. The Keystone units should be pushed towards the face of the wall until they make full contact with the pins. Do the same for the remaining courses.
- Capping the wall: It involves application of Keystone Kapseal adhesive on the top surface of the last course before the application of cap units. Place the Keystone Cap unit over the pins on the underlying unit and pull the cap unit forward to the automatic setback position. Grade should be finished with appropriate plastic soil cap or drainage swale to minimize surface water flow into wall/soil structure.
Hire a Keystone Standard Unit Contractor
We provide specialized contractors for standard units and they do the installation at reasonable prices. Our contractors are available for small scales as well as for big projects and can be contacted to gain information about estimation.
If you need more information about keystone standard units or you have specific questions please contact us.
Gallery of Retaining Walls in
Recent Blog Posts
Features of a VPN Application
A vpn application enables users to send and acquire data throughout a network, extending their very own private network across open public networks. It provides privacy just for users affordable , you can that just authorized people have acc... read more


